Getting Started with Modern Calligraphy {The Basics}
Now that you’ve got all your materials, I bet you’re just itching to get started practicing calligraphy. This guide will give you a little information to get started.

Setting Up Your Calligraphy Materials
Before you insert the nib into the holder, you’ll need to “prime”, or clean, your nib. The nibs come from the manufacturer with protective oil on them and that oil is not conducive to calligraphy. Wash your nibs with dish soap or some baking soda and water on a toothbrush. Gently scrub the nib, rinse it under water, and dry it with a non-fibrous cloth or paper towel. (If paper towel fibers get stuck in the nib, gently pick them out to avoid future ink problems.)

Once your nibs have been primed, you’re ready to insert your nib into the holder. Nib holders with universal inserts will have little prongs that resemble petals.


Insert the non-pointy end of the nib between the holder and the prongs. Do not insert them in the middle of the prongs, however logical this may seem. The outside metal circle has a break in it. Put your calligraphy nib where the break happens. Push it in tight, but don’t force it. You’ll want to grasp the nib by the blunt end because the pointy ends can be quite sharp.


Next, dip your nib into the ink. You’ll want to dip about halfway up the vent. The vent is the little hole about halfway up the nib. Better to have too little ink than too much, so you may want to err on the side of too little.


And now you’re ready to write!
Practicing Modern Calligraphy
If you’re like me you’re ready and raring to write some beautiful, obviously-perfect (sarcasm heavily implied) modern calligraphy. This is where you, and I, have to hold our horses. In order to get the best results, first you’ll need to go back to basics.
Holding Your Pen
I grip my pen the same way that I would a regular pen, pinching with my thumb, pointer, and middle finger. My ring finger supports the pen from underneath and my pinky ends up dragging on the paper.

Hold your pen at a 45 degree angle from the paper. Unlike writing with a normal pen, move the tip of the pen, not the whole pen. In addition, instead of pressing the nib into the paper, you’ll want the nib to gently glide along the paper.
Back to Basics
When I was teaching kindergarten, we had this great writing curriculum that taught the students the basic strokes for letter formation. There was the c stroke, tall line down, short line down, rainbow curve, etc. My students made a lot of progress in writing because they were taught the basics first, then how to use those basics to write letters. Learning calligraphy necessitates the same approach because in a sense you’re learning how to write all over again. All letters are comprised of basic strokes and if you practice these strokes before forming letters, you will be able to write your letters with ease.
Practice Downstrokes
One thing that makes calligraphy beautiful is the contrast between the thick downstoke of the pen and the thin upstroke.
The key to getting these thick and thin strokes is pressure. When the nib is pulled down, the tines of the nib spread apart to create the thick lines of the downstroke.


Experiment with pressure to get a nice even downstroke (press fairly hard, but not so hard that the nib snags on the paper).
 Calligraphy practice task #1: Practice downstrokes
Practice Upstrokes
Downstrokes are thick, upstrokes are thin. When you move your pen upwards on the paper, apply very little pressure so you get only a thin line (sometimes called hairlines). It’s trickier to get these perfectly straight when you’re practicing them in isolation, so don’t worry if yours aren’t 100% straight (mine weren’t!). Remember to keep your pen at 45 degrees. Upstrokes and downstrokes are the meat and potatoes of your calligraphy writing.

(Confession: These aren’t hand-drawn. They’re part of a basic strokes worksheet I’m working on for my Etsy shop. Upstrokes are hard to draw perfectly straight and I wanted to give budding calligraphers a better chance at a straighter line than I would give them with my hand-drawn lines.)
Calligraphy practice task #2: Practice upstrokes
Practice C-Strokes and Circles
These letters are formed using c-strokes and circles: a, b, c, d, g, o, p, and q. I usually start my c-strokes and circles at about 2 o’clock on the paper. Check your form: If you’re holding your pen the right way the left side of your shape should be thick, while the right, upstroke side of your shape should be thin.


Calligraphy practice task #3: Practice c-strokes and circles
Practice Loops
These letters are almost always formed using loops: e, f, g, j, l, o (the inside loop), and y. These letters are sometimes formed using loops: b, d, h, k, q, r, s, t. Practice thin and thick loops, upward-facing and downward-facing loops.

Calligraphy task #4: Practice loops
If you’d like more practice with these and other basic strokes, here’s a great basic strokes exercise worksheet.
Using These Strokes to Form Letters
Want to know how to put these strokes to use and make letters? Check out: Getting Started with Modern Calligraphy {Letter Formation}.

Looking for a practical way to practice letters? Get the Christine style calligraphy worksheet below.
 Previous Post
 Next Post
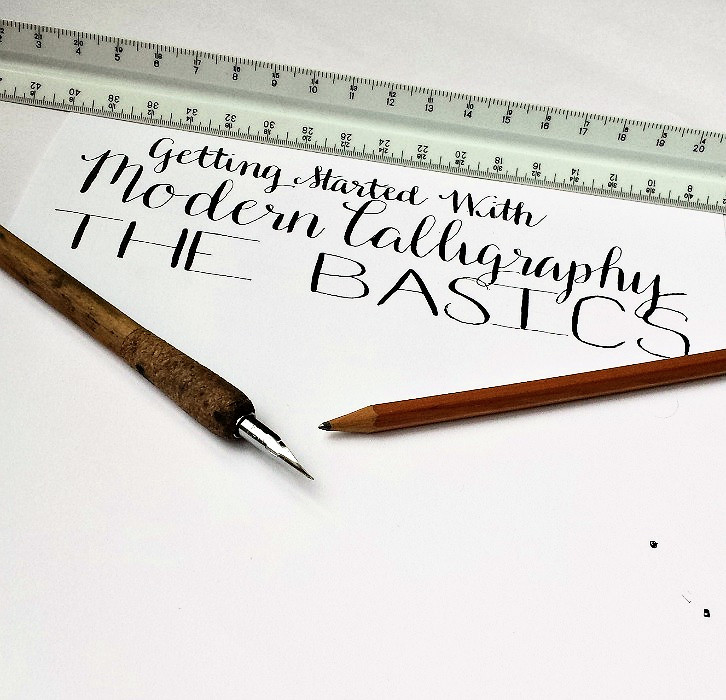
Hi! I just got my very first pen, but contrary to the fountain pen I used before this one feels very scratchy in the paper. Am I doing something wrong? Is there a fine tuning step I am not aware of??
I’ve never used a fountain pen before, so I can’t speak to that. Because the nib of a dip pen is very pointed, the tip of the nib will be a little scratchy on the paper. It shouldn’t dig into the paper, but if your nib scratches that is normal.